Printable template
Symmetry Drawing Template
Half image to complete symmetrically.
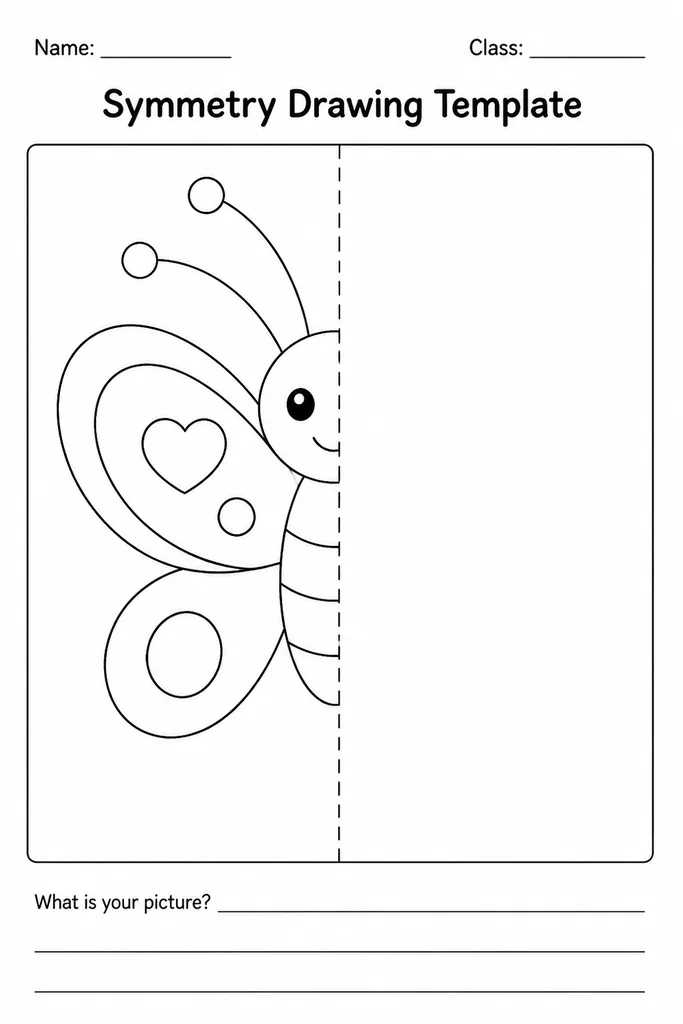
This symmetry drawing template provides a half-completed image on one side of a central line of symmetry, leaving the other half completely blank for students to mirror accurately. Depending on the version, the line of symmetry runs vertically down the centre, horizontally across the middle, or diagonally. The pre-drawn half might be a simple geometric shape, a butterfly wing, a face, a leaf, or an abstract design—giving students a clear and achievable completion task. Students in grades 1–6 use it to build understanding of reflective symmetry through hands-on drawing rather than abstract rules. Teachers use it across both art and maths lessons—it sits naturally in geometry units as well as observational-drawing practice. Because one half is already there, even reluctant drawers feel confident completing the task, and the finished result always looks satisfying.
Learning objectives
- Understand and apply the concept of reflective symmetry
- Develop accurate mirroring skills using a central axis
- Practise spatial reasoning by translating a shape across a line
- Build observational drawing confidence with a guided starting point
- Connect visual art symmetry to geometry and mathematical symmetry concepts
- Explore symmetry found in nature, architecture, and decorative design
How to use this template
- Print one copy per student—choose the vertical, horizontal, or diagonal symmetry version as appropriate.
- Study the completed half carefully, noting key points, lines, and shapes.
- Use a pencil to mark corresponding guide points on the blank side before connecting them.
- Draw the mirror image lightly first, then go over with confident lines and add colour or pattern to both halves together.
- Check the finished drawing by folding along the line of symmetry—the two halves should align closely.
Classroom & home ideas
- Use it as a cross-curricular maths-and-art lesson: introduce line of symmetry in maths, then immediately apply it with the drawing template in the same lesson or the following one.
- Ask students to colour both halves identically—this reinforces that symmetry applies to colour and pattern, not just shape.
- Project a half-completed image on the whiteboard for a whole-class guided completion before students attempt their individual templates.
- Have students create their own unique symmetrical design by filling in the blank half in a creative, personal way—two students given the same half will produce very different finished images.
- Connect to a science lesson on bilateral symmetry in living things: use a half-butterfly or half-leaf template and discuss why symmetry appears so often in nature.
Skills practised
Frequently asked questions
How do students ensure their mirror image is accurate?
Teach them to count grid squares or use a ruler to measure key points from the central line on the drawn side, then mark the same distance on the blank side. Connecting those points gives a reliable outline to refine.
Is this template used in maths class or art class?
Both. Maths teachers use it to make the concept of line symmetry concrete and visual. Art teachers use it to explore pattern, balance, and composition. It is an ideal cross-curricular resource.
What difficulty levels are available on this template?
Simpler versions feature bold geometric shapes or a single curved form—suitable for grades 1–2. More complex versions with intricate patterns, detailed faces, or overlapping shapes suit grades 4–6.
Can students fold the paper to check their symmetry?
Yes—folding along the central line and holding it up to the light is a satisfying self-check method. Encourage students to do this before adding final colour so corrections are still easy to make.
Likes & comments
See what other teachers think and share a helpful note.
Create more worksheets in our Worksheet Studio
Generate fresh worksheets for any grade, topic, and language — free.
Open the Worksheet StudioRelated worksheets
School Event Coloring Pages Pack 2
Song-Writing Template

Pixel Art Grid 32x32 (Blank)
Zentangle Frame
Artist Study Template

Minecraft-Style Build Grid

Pixel Art Grid 64x64 (Blank)