Printable template
Stained-Glass / Window Template
Outlined sections to colour.
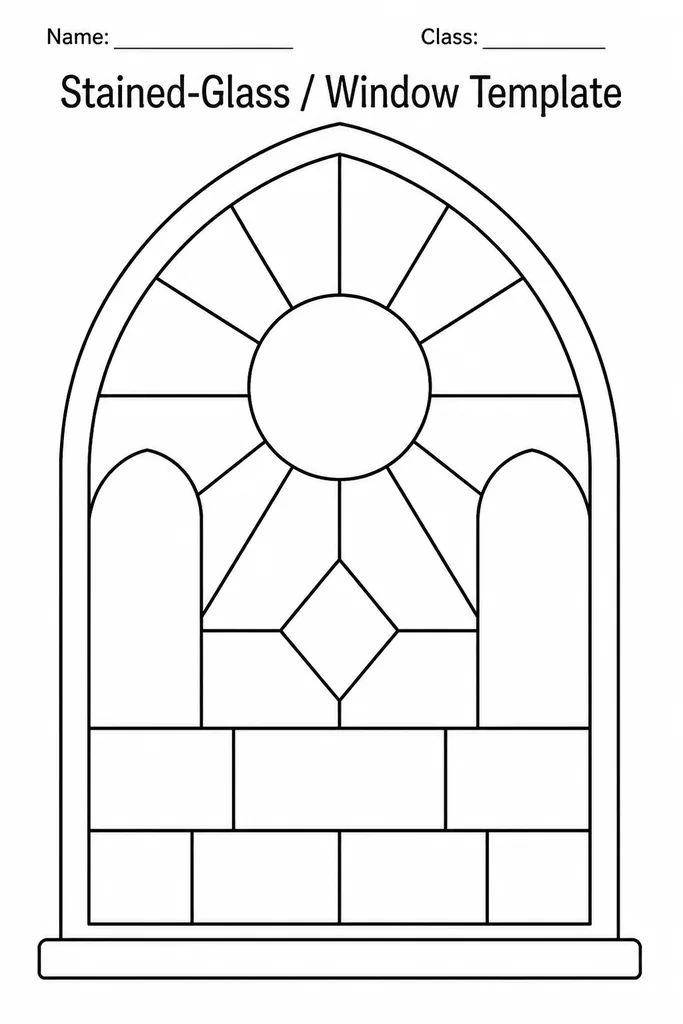
The Stained-Glass Window Template is a blank printable divided into irregular outlined sections that mimic the lead lines of a traditional stained-glass or mosaic window design. Students in kindergarten through grade 6 colour each section with a different hue, creating a vibrant, light-filled effect when finished. The outlined cells handle the compositional work so students can focus entirely on colour selection, blending, and the visual impact of adjacent colours. Teachers use it during colour theory lessons to explore warm and cool palettes, complementary pairs, or gradient progressions across sections. It also works beautifully as a seasonal display piece — Easter rose windows, autumn leaf mosaics, or holiday lantern scenes. Because no drawing skill is required, every student produces a polished-looking result, making it one of the most inclusive art templates for mixed-ability classrooms. Parents use it at home as a focused, meditative colouring activity.
Learning objectives
- Explore colour theory through deliberate section-by-section colour choices
- Develop neat colouring technique within defined outlines
- Understand how adjacent colours interact visually
- Produce a display-quality artwork without advanced drawing skill
- Connect art practice to cultural and architectural history of stained glass
- Encourage careful planning before applying colour
How to use this template
- Download and print the template on white paper — the heavier the stock, the better the colours show.
- Plan your colour scheme lightly in pencil or mentally before committing — warm/cool contrast, rainbow order, or a chosen theme.
- Colour each section neatly within the outlines using crayons, markers, coloured pencils, or watercolour pencils.
- Once dry, hold the finished sheet up to a window or light box to see the stained-glass glow effect.
- Optional: outline each section with black marker over finished colour for a crisper lead-line look.
Classroom & home ideas
- Colour theory lesson: assign warm colours to one half of the window and cool colours to the other, then discuss the contrast as a class.
- Class display: each student colours the same template with a different palette; mount the set on a bulletin board or tape to windows for a gallery effect.
- Seasonal art: use the template for holiday displays — Christmas, Diwali, Eid, or spring festivals — by choosing appropriate colour themes.
- Media exploration: try the same template twice, once with crayons and once with watercolour wash, and compare how different media affect the finished look.
- History connection: pair the colouring activity with a short lesson or photo gallery of famous stained-glass windows from Notre-Dame, Sainte-Chapelle, or local heritage buildings.
Skills practised
Frequently asked questions
What colouring materials work best?
Coloured pencils give fine control inside small sections; broad-tip markers produce vivid, saturated colour quickly; watercolour pencils can be blended with a damp brush for a translucent, glass-like effect. Avoid very watery paint on standard copy paper as it may warp.
Is there a right or wrong colour scheme?
No. Students are free to use any palette they choose. Teachers may suggest constraints (e.g. no two adjacent sections the same colour) to make the activity more intentional, but any colour choice produces a valid artwork.
Can younger students (K–1) use this template?
Yes — look for versions with larger sections, which are easier for small hands to colour neatly. Kindergarten students may stay within the lines loosely, and that is fine; the process matters more than precision at that age.
How should I display the finished artwork?
Tape finished sheets to a window so natural light shines through for a genuine stained-glass glow. Alternatively, mount them on a black backing card and display on a bulletin board — the dark border mimics the lead frame effect.
Likes & comments
See what other teachers think and share a helpful note.
Create more worksheets in our Worksheet Studio
Generate fresh worksheets for any grade, topic, and language — free.
Open the Worksheet StudioRelated worksheets
School Event Coloring Pages Pack 2
Song-Writing Template

Pixel Art Grid 32x32 (Blank)
Zentangle Frame
Artist Study Template

Minecraft-Style Build Grid

Pixel Art Grid 64x64 (Blank)